
Design and Prototyping of 3D Printed Protein Models for Education
- Aug 30, 2020
- 4 min read
The results of a 12 week research project in which I designed a process to 3D print affordable, flexible, detachable, color coded models of proteins for hands-on pedagogical use.


INTRODUCTION
This summer, I spent 12 weeks designing, protoyping, and testing mechanical and structural components of 3D printed protein models under the guidance of Professor Rebecca Taylor at Carnegie Mellon University. The complete shareable outcome is available through a series of posts, all linked on this page.
Comprehensive Documentation
I have provided condensed and organized documentation of my experiments in these posts: 3D Printed Snap Connectors that Print as One Piece and Determining Feature Ratios for Flexible 3D Printed Protein Models (coming soon).
There are also pages whose primary purposes are to serve as step-by-step guides for creating these protein models. They are written for a general audience (not just mechanical engineers), and only require free, open-source software, so that everyone can have access to this information! Access them here: How to 3D Print Optimized, Separable Protein Models and How to Custom Color 3D Prints.
Learning Experience
From this experience, I've learned how to use Chimera, MeshLab, and MeshMixer, and have also greatly furthered my skillset in Solidworks. I've also developed many new ways of thinking. I've had to break down issues into tiny, fixable steps to determine the root of a issue. I've developed problem solving skills that require considering an overall goal, and figuring out where in the timeline each step toward the goal belongs. This was especially important when I had to make adjustments in one application to allow the next program to function properly.
For the first time, I designed testing structures that will fit into fixtures and simplify data collection, such as the setups I used to calculate feature thickness ratios. In addition, since none of the software I used is privately owned, there aren't huge, comprehensive guides detailing the function of every feature and how to use them. I've gained a lot of experience collecting information using limited resources, and figuring out how to apply solutions that work for vaguely similar problems to my own issues.
I've synthesized my main purposes, methods, and results here, but for even more information, I actually have a 72 page (and counting!) long document containing raw notes on everything I've learned and discovered over the course of this project.
RESEARCH PURPOSE AND SCOPE
Motivation
Currently, the use of 3D printers to fabricate large scale protein models has limitations due to complexity, cost, and size. For example, one existing approach uses desktop 3D printers (fused deposition modeling) so that the process is cheap, but that process uses breakaway support material that does not support cavities and also requires substantial extra post processing. (Beltrame 2017) Furthermore, these structures are inflexible, and do not support separation or interchangeability of subsequences with no ability to color code within structures.
Another novel approach called “peppytides” allows the construction of magnetically-connected peptides. However this approach is for atomic scale models and is really limited to short peptides, thereby limiting the size of the proteins you can model.(Chakraborty 2014)
Therefore, despite activity on the development of macroscale models of proteins, flexible and modular models of large proteins are not feasible. In this work, we propose to develop a methodology for 3D printing such protein ribbon structures for broad use in science and engineering education.
Figure 1


Existing protein models require a tradeoff between cost and modularity/flexibility: (left) Inflexible 3D printed protein model is connected with struts at the location of each hydrogen bond.(Beltrame 2017)(right) Reconfigurable peptide modelling system “peppytides” are made of magnetically connected 3D printed components, but due to cost and complexity, large proteins can not be feasibly modeling with this approach.
Application for Research Findings
This project will result in a new tool for generating 3D-printable and unsupported (compliant and unfixed) printed models of proteins and DNA nanostructures. The models created using this tool will allow students, researchers and clinicians the opportunity to physically manipulate (bending, unfold and disassemble) the proteins and nanostructures that they research, enabling the development of physical intuition for their structure. Creation of snap-together models will also allow students and researchers alike to assemble and disassemble their structures as swap in mutations on demand.
References:
Da Veiga Beltrame, E., Tyrwhitt-Drake, J., Roy, I., Shalaby, R., Suckale, J., & Pomeranz Krummel, D. (2017). 3D Printing of Biomolecular Models for Research and Pedagogy. Journal of visualized experiments : JoVE, (121), 55427. https://doi.org/10.3791/55427
Chakraborty, P., & Zuckermann, R. N. (2013). Coarse-grained, foldable, physical model of the polypeptide chain. Proceedings of the National Academy of Sciences of the United States of America, 110(33), 13368–13373. https://doi.org/10.1073/pnas.1305741110
MAJOR RESULTS
Complete Step-by-Step Guide Accessible to a General Audience
This detailed guide requires only free software, and walks all the way through how to take a protein PDB file from the web and make it into a handheld object with detachable pieces.
Some of the steps include:
Bridging protein gaps with snap connectors in Chimera
Ribbon structure edits in Chimera
Cleanup and feature deletion in Meshlab
Polygon reduction in Meshlab
Creating hollows and escape holes in Meshmixer
Scaling and submission to Shapeways
The full tutorial is called How to 3D Print Optimized, Separable Protein Models.


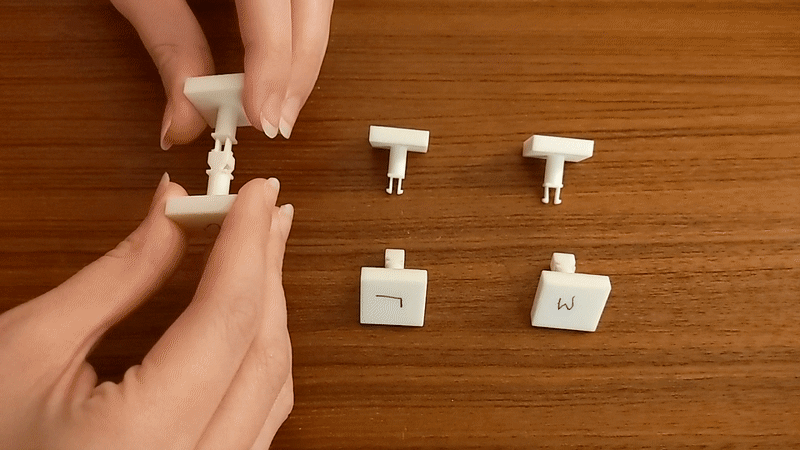
Single Unit Snap Connectors
These snap-fit connectors can be 3D printed in a pre-attached state, which means that proteins can be manufactured as a single unit. This reduces cost significantly, since most of the price is determined by the model's bounding box. After many iterations, I decided on this connector because it is extremely easy to put together, simple to separate using the side tabs, has a lot of strength opposing the action of pulling straight out, and experiences minimal rotation and wobbling. The post containing my experimental process is called 3D Printed Snap Connectors that Print as One Piece.


Custom Color Coding
Having color coded detachable segments greatly increases the pedagogical impact of these protein models. However, requesting colored prints is very costly on Shapeways, especially when printing many small pieces. On large models, color is sometimes not even an available option. Fortunately, I developed a rapid technique to create vibrant, uniform, and durable color that only requires a few inexpensive supplies. My post called How to Custom Color 3D Prints provides a complete tutorial and details my experimental process.


Comments