
Custom Free Standing Lace (FSL) Embroidery Using PEmbroider
- May 4, 2023
- 4 min read
Easily create beautiful custom lace designs on your embroidery machine with FREE, open source software called PEmbroider. Programming experience is recommended!


Supplies*:
Creative Inquiry's Free / Open-source PEmbroider software, to write out design instructions
"Processing" IDE, to simulate designs
Some coding experience is recommended!
Embroidery machine. I don't own one, but my school has them! If you are a student, check if your school has them too :) Or, a local makerspace might.
Heavy duty needle to go through multiple layers of thick thread
Embroidery threads that are thick and preferrably shiny
Water soluble stabilizer: thick and slightly stretchy
The thin stabilizer will rip, not hold its shape, and get caught in the machine. Non stretchy stabilizer will not comply with the thread, and will rip. Tear-away or cut away stabilizer will be impossible to remove. I learned this the hard way! I highly recommend trying to find a Free-Standing Lace specific stabilizer. This is the one I used.
*I may earn a small commission from purchases made by clicking Amazon product links, at no additional cost to you. Learn more.
No Coding Method? In progress...
I am still working on this. I hope to eventually automate this process and maybe even integrate it directly into this website. Luckily the method below doesn't require writing any lines of code, just modifying some numbers and text.
Low-Coding Method
All you need is to get one or more picture files ready, and add those file names into the code I already wrote. You will need to adjust some numbers to get the size right. If you want more customizability, keep reading the other sections! I'm working on making this method more user friendly and readable, so let me know in the comments what else I could add to be helpful.
Download and Install PEmbroider / Processing IDE
Creative Inquiry has great instructions (with pictures!) on their GitHub outlining how to get their software running on your computer. If it's still unclear, or you need help getting started, let me know in the comments!
Download and Modify My Example File
The .pde file contains all the necessary commands to make a piece of free-standing lace. It uses multiple images for the "background" section and "graphics" section. There are some guidelines in the comments of the code. The pictures and .pes file are there as examples. For more detailed editing guidance, scroll down to read the editing instructions!
I made a folder in the examples folder of PEmbroider's library to make it easy to find. Drop all these files (plus your images) into there. Make sure to name the folder the same name as the .pde file.

Find Some Pictures
Find an image you like, ideally with clear, thick lines, and an empty background. This could be a logo, clipart, vector art, or a simple line drawing. Use your phone's editing tools, or find an online image converter, to convert your image to pure black and white (NOT grayscale!). The logo should end up white, and the background should be black. You can mess around with inverting colors as needed. If you want a background shape, like a heart or a circle rather than a rectangle, find one of those too. Same procedure applies.


Put these pictures into the folder with the .pde file.
Export .PES File and Upload to Embroidery Machine
Uncomment the "save" line near the end of the code. Upload the .pes file to your embroidery machine using a USB drive. I would recommend first trying this on a piece of fabric to make sure it works! :) Once you are ready, load the water-soluble stabilizer into the embroidery hoop, by itself. You're all set to embroider!
Editing Instructions / How It Works
Resize Display Window
Before working on your design, scale up the display window in line 13 so your picture fits. You can always scale it down later. It is pretty large in the example file so that it's easier to work with. However, this may not fit into your embroidery hoop, so when you're finished with your design, cut it down as close to your graphics as possible.
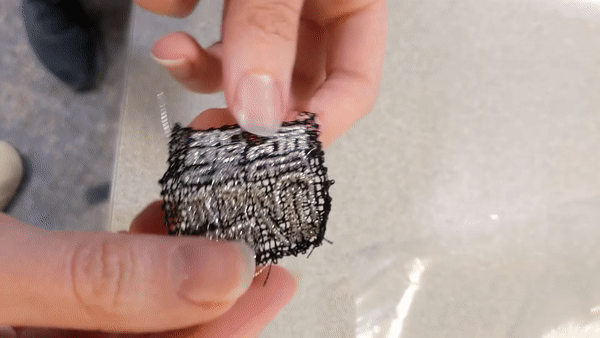
Mesh Underlay
First we need to create a mesh / grid for the "underlay". This is essential!!! Without it, your design will fall apart into one long string when you dissolve the water-soluble stabilizer. I found that the mesh creates a foundation without tearing the stabilizer, and then when the main design is embroidered, it does tear the stabilizer, but the mesh holds it together at that point. The most simple mesh is a rectangle with evenly spaced horizontal and vertical lines. Alternatively, you could make it in a specific shape. Both options are included in the code.


Resize your image using an image editor, or change the size of your rectangle in the code, to make sure your inner graphics fit onto them. I'm working on figuring out how to resize images within the code, so if anyone figures it out, please let me know!
Outlines (Parallel & Perpendicular Strokes)
Next up, we can draw the outlines of our background and graphics! First we start with strokes parallel to the shape (straight stitch), as a base for the satin stitch to grab onto. This ensures that when we dissolve the stabilizer, the satin stitch doesn't unravel. The underlay should mostly prevent that from happening, but this is an added layer of security.
Finally, we finish it off with strokes perpendicular to the shapes (satin stitch). This makes a nice bold, shiny border.


Make sure to adjust the starting x and y coordinates of your graphic so it fits within your background shape.
Advanced Customization
While the easiest method for creating FSL with my code is using the bitmap image converter built into PEmbroider, you can also draw your own shapes. I tried making a geometric lace pyramid by drawing triangles and lines.


If you read through the PEmbroider documentation and example files, you can see the different ways to make these shapes. You can experiment with different hatching styles, etc. The key to making FSL work in any situation is to always create an underlay, then do parallel stitches, then perpendicular.
Within my code file, there is some customization you can do as well. You can make the lines thicker or thinner, change the spacing in between strokes, change stitch length, add more graphics to the file, etc. You can also change the angle of the mesh, in case you'd prefer a diagonal grid, or maybe a triangular mesh. There are some comments in the code that point to the parameters.
Best of luck, and happy crafting!